
-
Website
-
3min Explainer Walkthrough

- Generate a Design
-
Page Management

-
Page Editing

-
Form Builder

- Updating Your Navigation Menu
- Creating Page Redirectors
- Posts Management
-
Search Engine Optimization (SEO)

- Setting Up Google Marketing Tools
- Setting Up Meta Pixel & E-commerce Tracking
- Setting Up Microsoft Marketing Tools
- Setting Up Reddit Pixel and E-commerce Tracking
- Setting Up Linkedin Insight Tag
- Optimizing Images For Web
-
Analytics

- Third Party Embed Code
- Special Files
-
3min Explainer Walkthrough
- Contacts
- Marketing
- Commerce
- Apps
- Settings and Config
Setup the Cliniko Integration
Sync patients and appointments from Cliniko to send targeted e-mail and sms campaigns, and to trigger automated workflows within Oncord.
In this article:
Before you Get Started
The integration between Oncord and Cliniko is free, and can be enabled regardless of which Oncord plan you are running. It's worth noting that in order to get the most value from the Cliniko Integration, we recommend enabling Oncord's Marketing features - so that you can send email and/or SMS campaigns.
An easy way to determine whether you have this plan enabled is to look for the "Marketing" heading in the left sidebar of your Oncord Dashboard.
Upgrading your Oncord plan is an easy and instant process, simply go to Settings > Features, and enable the marketing module (read more).
What Data is Synchronised?
The Cliniko integration works by synchronising the following information:
| From Oncord | From Cliniko |
|
Contacts
|
Patients
|
Appointments
|
Appointments
|
Note: Because deletions are not reflected in either system, you may need to delete entries in both systems.
Contact Fields Synchronised
When a contact is synchronized with Cliniko, a blue Cliniko logo will display, allowing you to view their patient record. The following contact fields are also synchronized with Cliniko:
Appointments Synchronised
Appointment data is pulled into Oncord, and will appear in the relevant contact's activity feed. The following appointment data is synchronized with Oncord:
Automation Triggers
Note: Email and SMS communications will only send to contacts whose marketing status is set to subscribed in Oncord. This setting is linked to the SMS & Email Marketing Accepted Status setting in Cliniko.
Enabling the Cliniko integration will add the following automation triggers within Oncord:
An automation triggers upon a specified number of hours or days prior to an appointment. You may further specify the
appointment type and practitioner. Typically, this automation trigger is used as an appointment reminder or to send patients important
information about their upcoming appointment.
Trigger an automation when a contact cancels their appointment. You may further specify the appointment type and practitioner.
Trigger an automation in the case that a contact does not arrive at their appointment. You may further specify the appointment type
and practitioner.
Trigger an automation in the case that a contact finishes their appointment. You may further specify the appointment type and
practitioner.
Trigger an automation at the time an appointment is created. You may further specify the appointment type and practitioner.
When will automations start to trigger for appointments?
Only appointment activity that happens after your Oncord account goes live, and the Cliniko integration is enabled and syncing.
Appointment Types reflected in Oncord automations
Oncord needs to sync at least one appointment before the appointment's type will appear as a setting for automation triggers. If you've created a new appointment type within Cliniko, and it hasn't appeared in your Oncord account yet, try creating a test appointment in Cliniko first for that new appointment type, and then run a sync via Oncord Dashboard > Settings > Apps. After doing this, the new appointment type should appear in the Automations area.
Marketing Send Conditions
When sending an email or SMS campaign via Oncord, you can target your campaigns based on appointments.
Note: E-mail and SMS communications will only send to contacts whose marketing status is set to subscribed in Oncord. This setting is linked to the SMS & Email Marketing Accepted Status setting in Cliniko.
Cliniko SMS & Email Marketing Accepted Status
When syncing contact data from Cliniko to Oncord this includes the contacts SMS & Email Marketing Accepted Status. Only contacts whose status is "Subscribed" will actively receive marketing communications send through your Oncord account.
If this setting in Cliniko is not enabled, when the contacts are imported into Oncord their Marketing Status will be set to "Pending". To fix this and set them to Subscribed in Oncord, go to the SMS & Email Marketing Accepted Status setting in your Cliniko account and enable both Email and SMS for all contacts.
To push this change straight away into your Oncord account you can do a manual sync by going to Settings > Integrations and click the sync button in the Cliniko box, this will sync and push the updated Marketing Status for your contacts. After this information is synced and updated your contacts in Oncord will be shown and set with the marketing status "Subscribed".
Connect Oncord & Cliniko
The first step to enable the Cliniko integration, is to connect Oncord and Cliniko.
When Does a Sync Happen?
You can choose to enable or disable automatic synchronisation within the Cliniko integration configuration page (Dashboard > Settings > Third Party Integrations).
Oncord will batch-sync with Cliniko two minutes after an update takes place within Oncord.
For instance, if you updated a contact's email address at 2:00pm, and then their phone number at 2:03pm. Both changes would be reflected at 2:04pm within Cliniko.
If no update takes place within Oncord, a scheduled sync will take place after one day to download data from Cliniko. You can also push a sync manually by clicking the "Synchronise" button on the Settings > Integrations page of your Oncord account.
Add Online Bookings to Your Website
Cliniko's online booking calendar allows you to take bookings via your website 24/7, reducing time spent taking bookings over the phone.
Before adding the online booking calendar to your website, follow Cliniko's provided instructions to configure and enable your online bookings page: Cliniko: Set Up Online Bookings.
There are two methods available for adding a booking function to your Oncord website:
1. Your Booking URL can be used as a simple text link or "Book Now" button on a page of your website, to direct the user away from your website to make an appointment via your Cliniko Online Bookings Calendar.
2. Embed Code can be added to a page of your Oncord website, which will embed your Cliniko Online Bookings Calendar on the page. You can find instructions below.
Embed Your Cliniko Online Bookings Calendar
Within Cliniko:
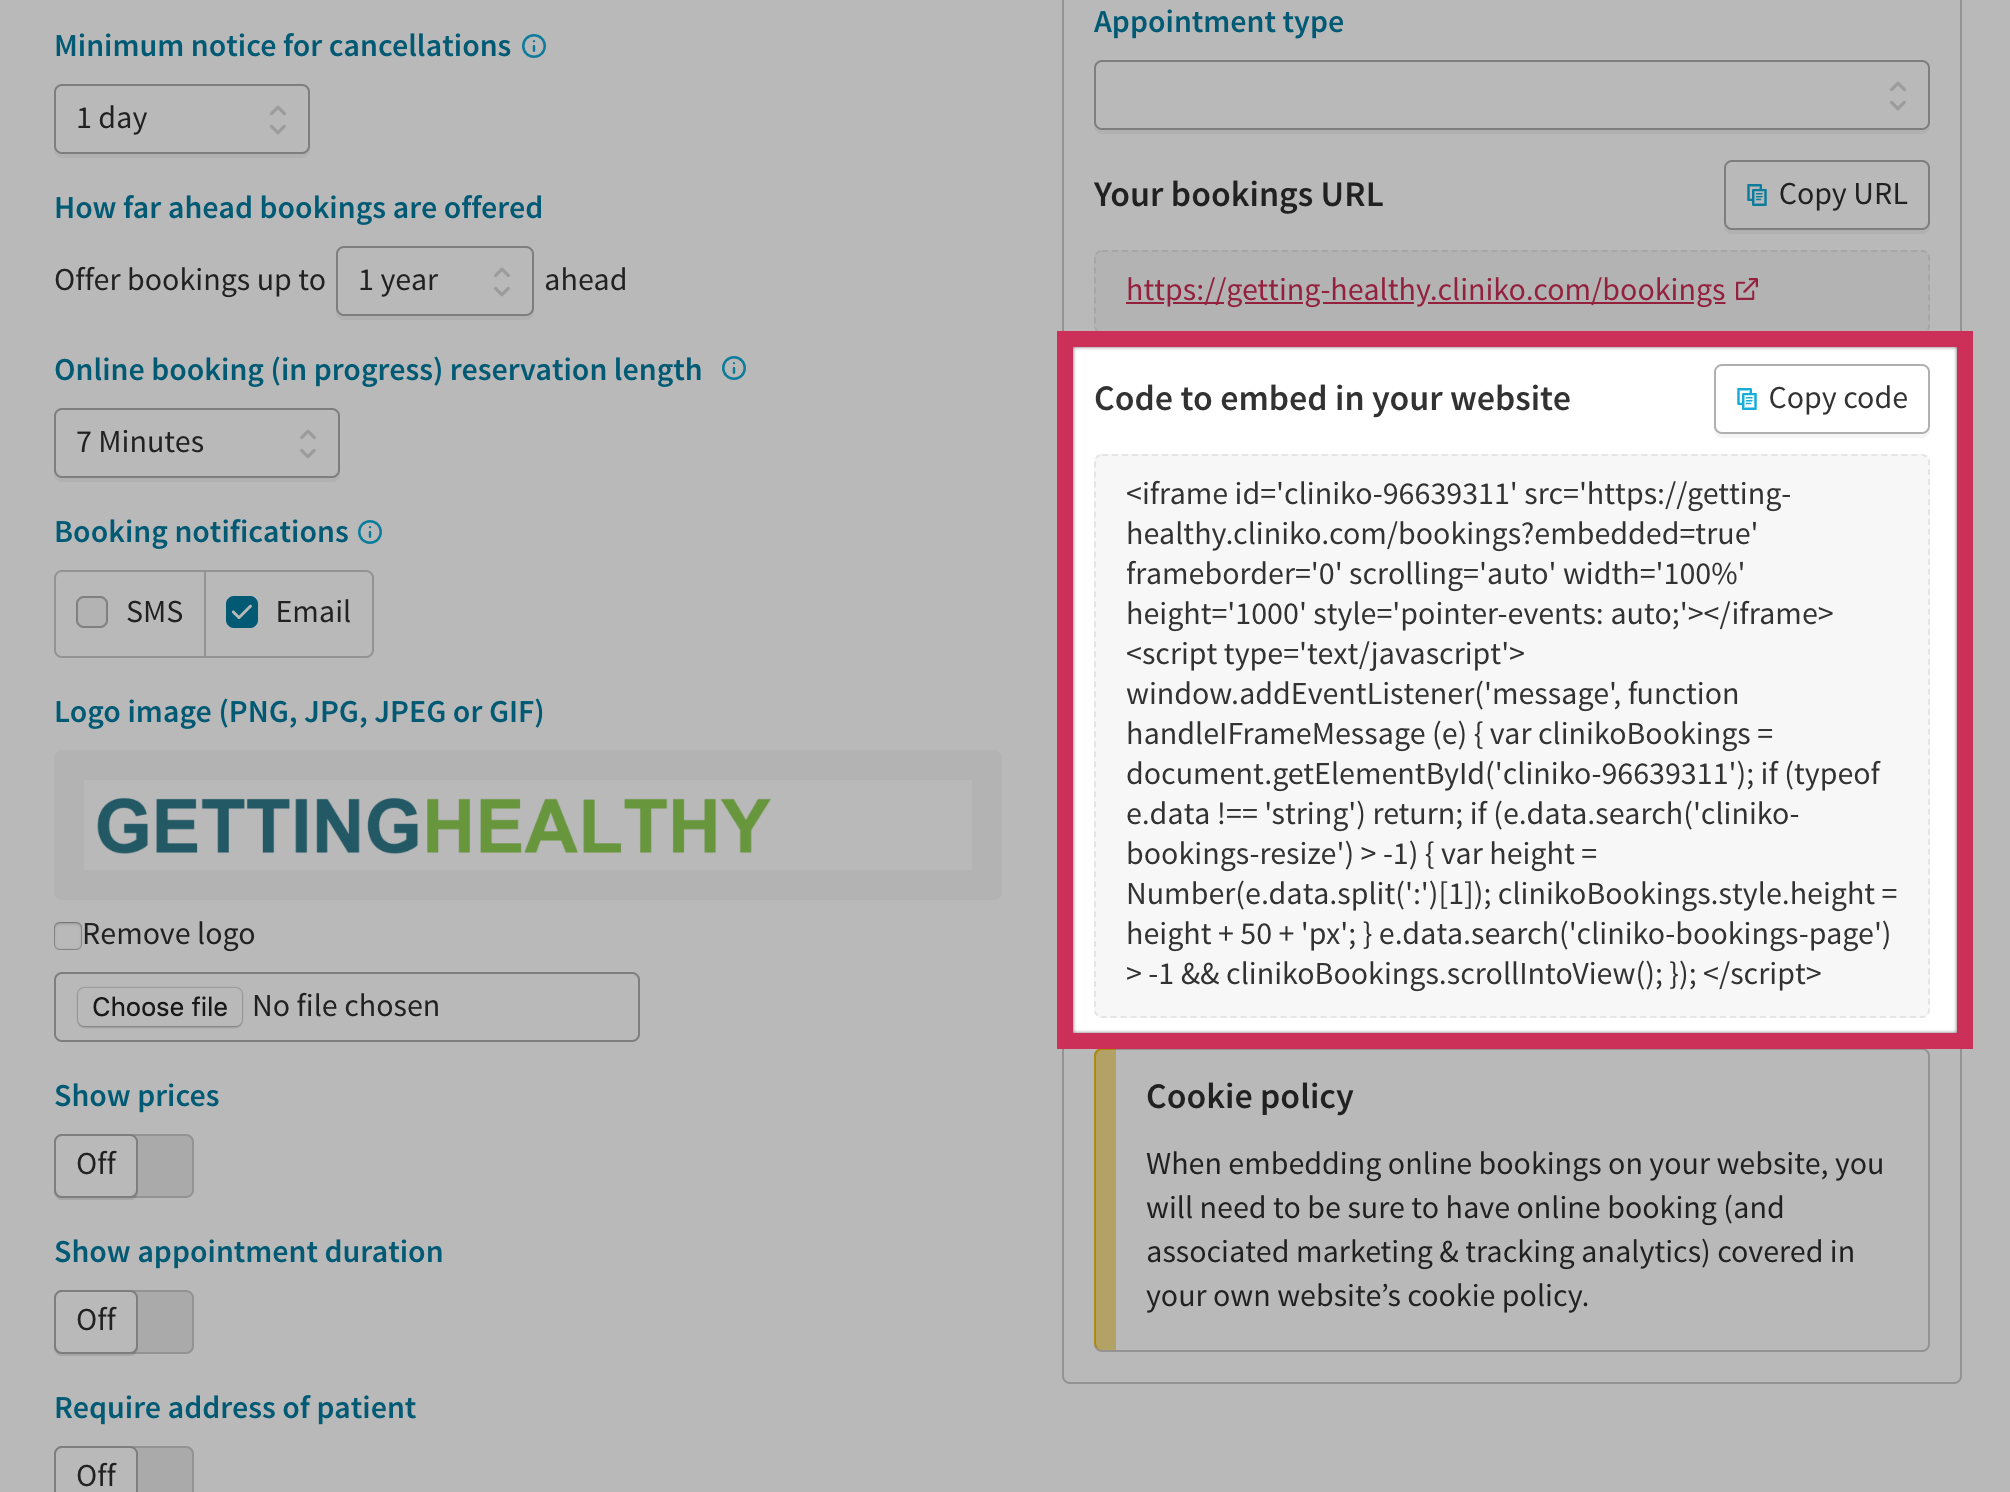
After retrieving the above code, login to your Oncord Website and add the embed code to a page:
(the following steps are shown in the video below)