-
Website
-
3min Explainer Walkthrough

- Generate a Design
-
Page Management

-
Page Editing

-
Form Builder

- Updating Your Navigation Menu
- Creating Page Redirectors
- Posts Management
-
Search Engine Optimization

- Setting Up Google Marketing Tools
- Setting Up Meta Pixel & E-commerce Tracking
- Setting Up Microsoft Marketing Tools
- Setting Up Linkedin Insight Tag
- Optimizing Images For Web
-
Analytics

- Third Party Embed Code
-
3min Explainer Walkthrough
- Contacts
- Marketing
- Commerce
- Apps
-
Settings and Config
- Going Live
- Billing
- Domain Health Checker
- Managing Administrators
- Registering a Domain Name
- Changing Your Domain Name
- The Role Of DNS Records Explained
- Backing Up Your Website
- Choosing an E-mail Host
- Hosting Email With Oncord
- Setting Up Gmail Hosting
- Setting Up Office 365 Hosting
- Setting Up Sub Domains
- Hosting a Sub-Site
Importing Products
Importing your products into Oncord is a straightforward process.
You can upload product data using a CSV (Comma-Separated Values) file, one of the most commonly used formats for handling data across platforms.
CSV files are compatible with tools like Microsoft Excel and Google Sheets, and they can be exported from most third-party systems for seamless import into Oncord.
The process
Step 1: Clean and Format Your Data
Before importing, it's essential to ensure your data is properly structured.
Files exported from other platforms may contain inconsistencies or formatting that Oncord cannot interpret, leading to data compatibility issues.
To prepare your file:
- Open the CSV using Microsoft Excel, Apple Numbers, or Google Sheets.
-
Review your product data. Each piece of information such as Product Title, Price, and Brand should be placed in its own column.
- Confirm that your headers and values are clearly defined and consistent.
We recommend referencing our pre-formatted Data Import Template to streamline this process.
Step 2: Save the File as a CSV
Once your data is clean and properly structured:
- Save the file in CSV format.
-
In Microsoft Excel, go to File > Save As, and choose CSV UTF-8 (Comma delimited) (*.csv).
- Saving in UTF-8 encoding ensures your file supports special characters and is compatible with Oncord’s import system.
Step 3: Creating Categories and Brands in Oncord
Before importing your product data, it’s recommended that you first create the relevant Categories and Brands in Oncord. This step ensures that your imported products can be properly grouped and structured within your online store.
To better understand how these elements relate, review the following resources:
Taking the time to configure categories and brands beforehand helps maintain data integrity and simplifies product management after import.
Step 4: Import Into Oncord
Once your product data is prepared, you can import it into Oncord by following these steps:
- Navigate to Dashboard > Commerce > Products.
- Click the three-dot menu in the top-right corner and select Import.
- Click Upload from My Computer and select the CSV file you’ve prepared.
You can then define how your data is structured:
- Field Separator: Choose the character that separates your fields (e.g., comma).
- Enclosed With: Choose the character that encloses text fields (e.g., quotation marks).
If you're unsure, you can leave these set to Auto-detect.
- Click Configure Import to proceed.
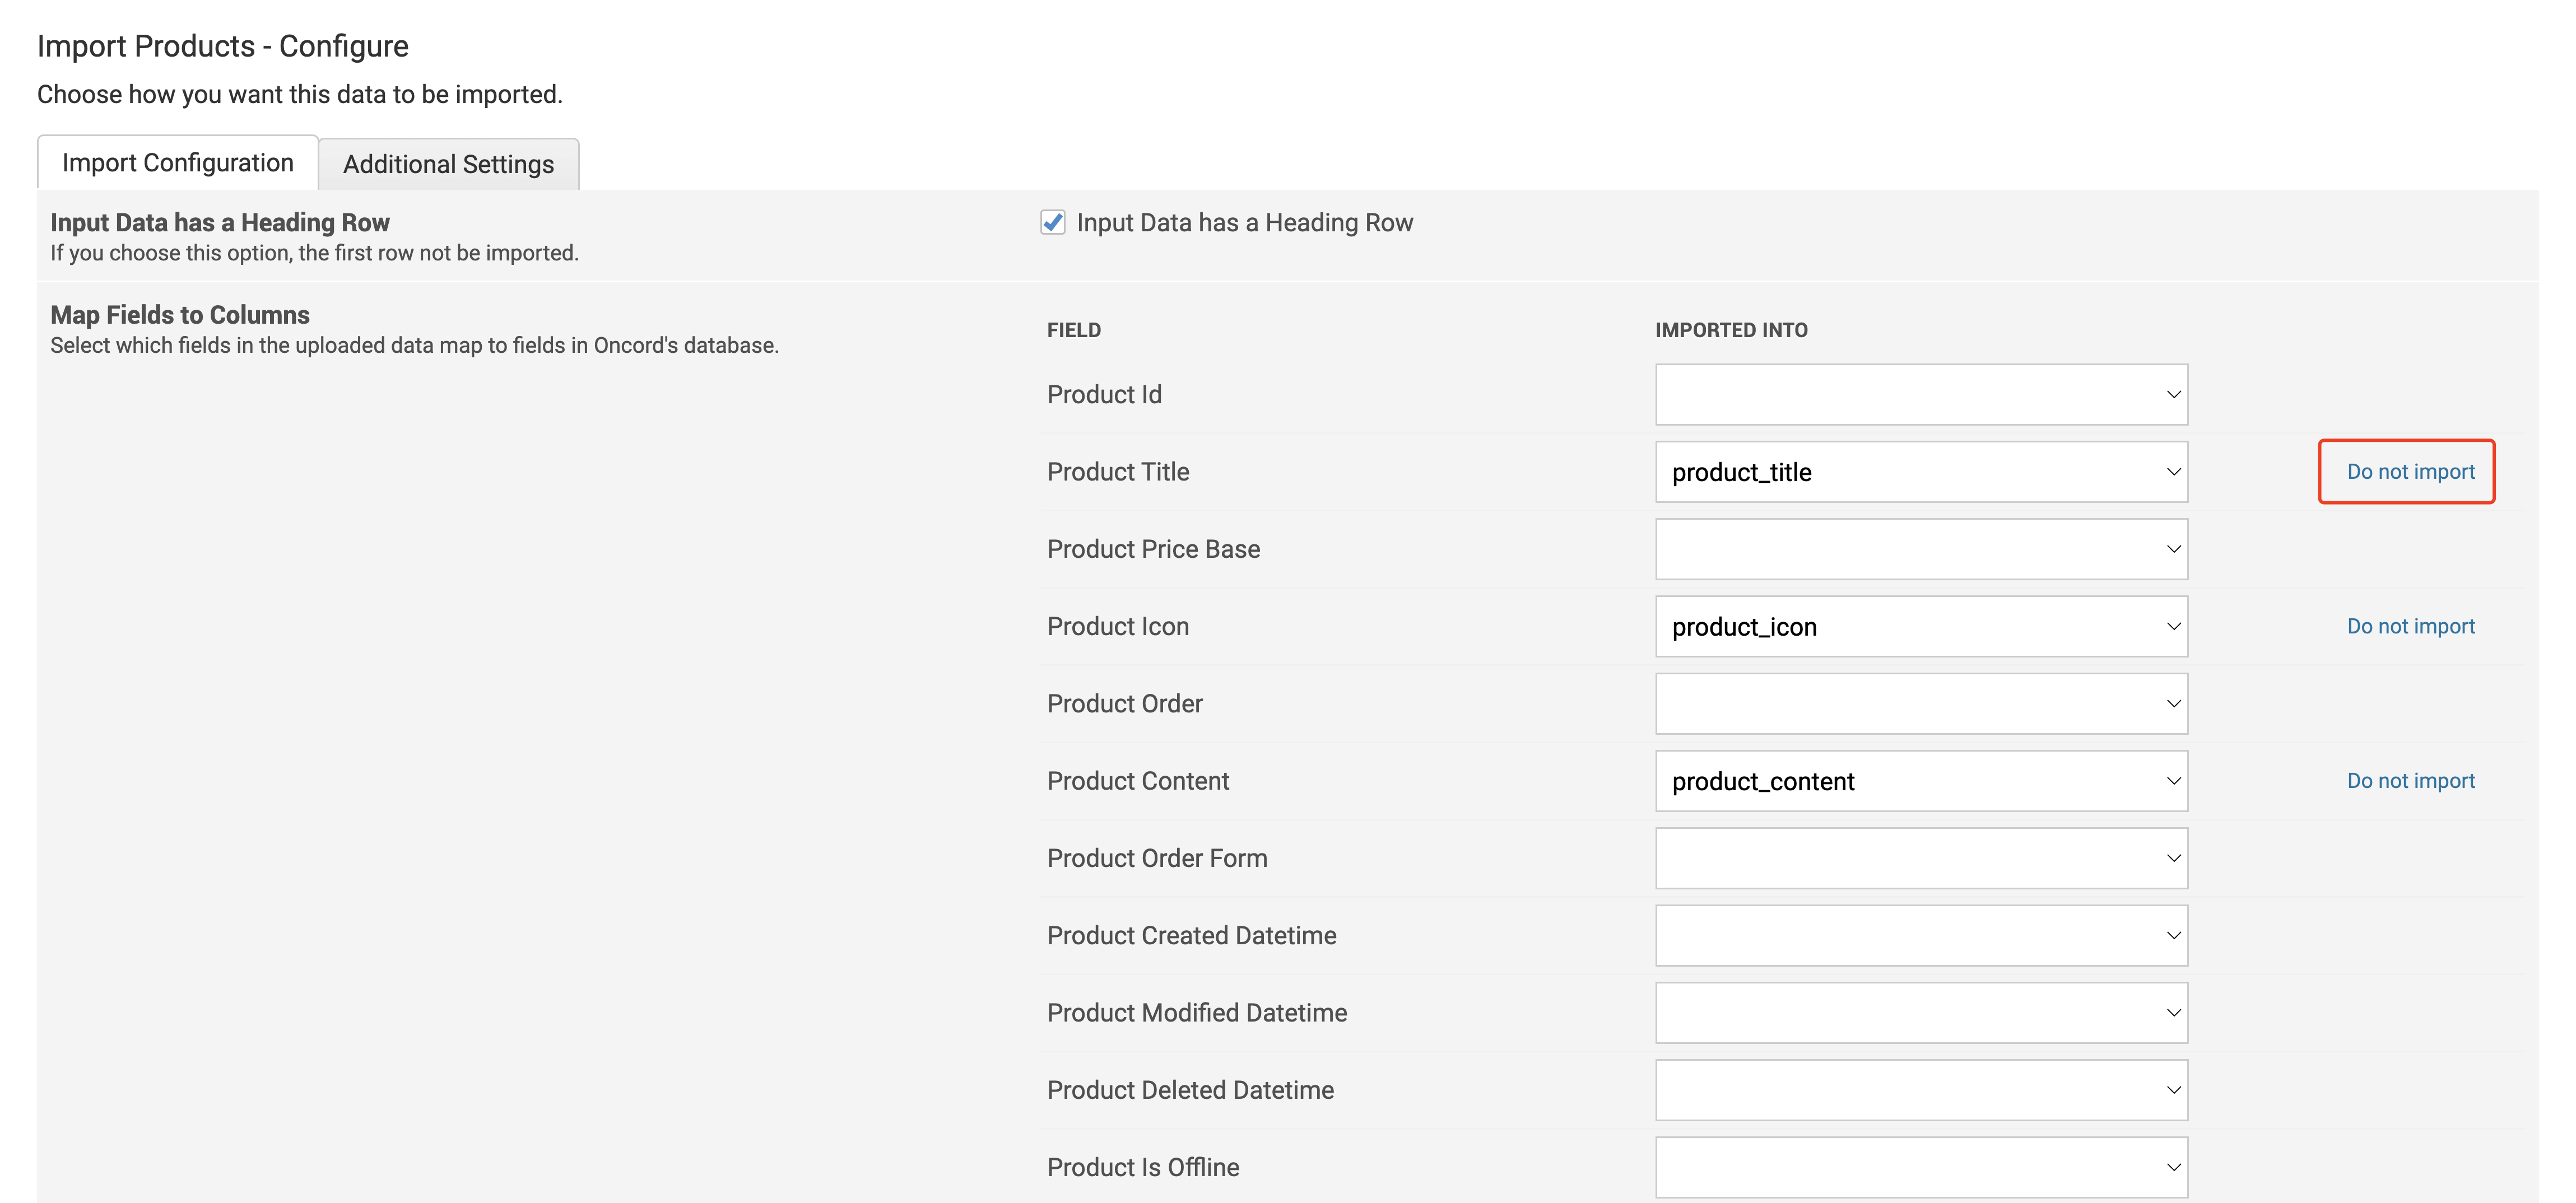
On the Import Configuration page, Oncord will automatically attempt to match your CSV columns to product fields in the
system. You’ll need to review and confirm these mappings:
- Input Data Has a Heading Row: Enable this option if your first row contains column headings. This ensures it's not imported as product data.
-
Map Fields to Columns:
- Use the dropdown menus to assign each column to the correct field in Oncord.
- To skip importing a specific column, choose Do not import from the dropdown menu.
- Use the dropdown menus to assign each column to the correct field in Oncord.
Take the time to verify each mapping to ensure your product data is accurately imported.
In the Additional Settings tab, you can configure how Oncord processes your product import.
This includes choosing how existing products are matched, whether new categories or brands should be created, and what to do with products not included in the import file. These options help ensure your import aligns with your existing store data and structure.
-
Look Up and Match Products on Fields: Defines how Oncord determines whether a product in your import file already
exists in the database.
- Product Title: Matches existing products by their title.
- Product Code: Matches existing products by their unique product code.
Tip: Selecting both fields helps avoid duplicate entries by ensuring accuracy during import.
-
When Data Already Exists: Specifies what action to take if a product being imported already exists in Oncord based on
the selected matching fields.
- Overwrite: Replaces the existing product record with the data in your import file.
- Leave Existing Data: Keeps the current product information unchanged, ignoring imported updates for matching records.
- Attach Products to Categories and Assign a Brand: These settings allow you to organise imported products by assigning them to specific categories and applying a brand.
-
Create or Match Brands and Categories: These settings control how Oncord handles brands and categories listed in your
import file that don’t already exist in your system.
-
Match only: Imports will use existing brands and categories only. Any unmatched entries in your file will be ignored.
- Match or create if not found: Oncord will automatically create new brands and categories based on the data in your import file.
-
Match only: Imports will use existing brands and categories only. Any unmatched entries in your file will be ignored.
These options are especially useful when importing products from new suppliers or platforms, helping you streamline setup and maintain an organised product structure without manual data entry.
-
Delete Products Not In Import Data: Offers a way to sync your Oncord store exactly with the data in your import file.
- If selected, Oncord will delete any existing products that are not present in the current import file.
- Note: Use with caution. This is ideal for complete catalog refreshes but may result in data loss if the file isn’t comprehensive.

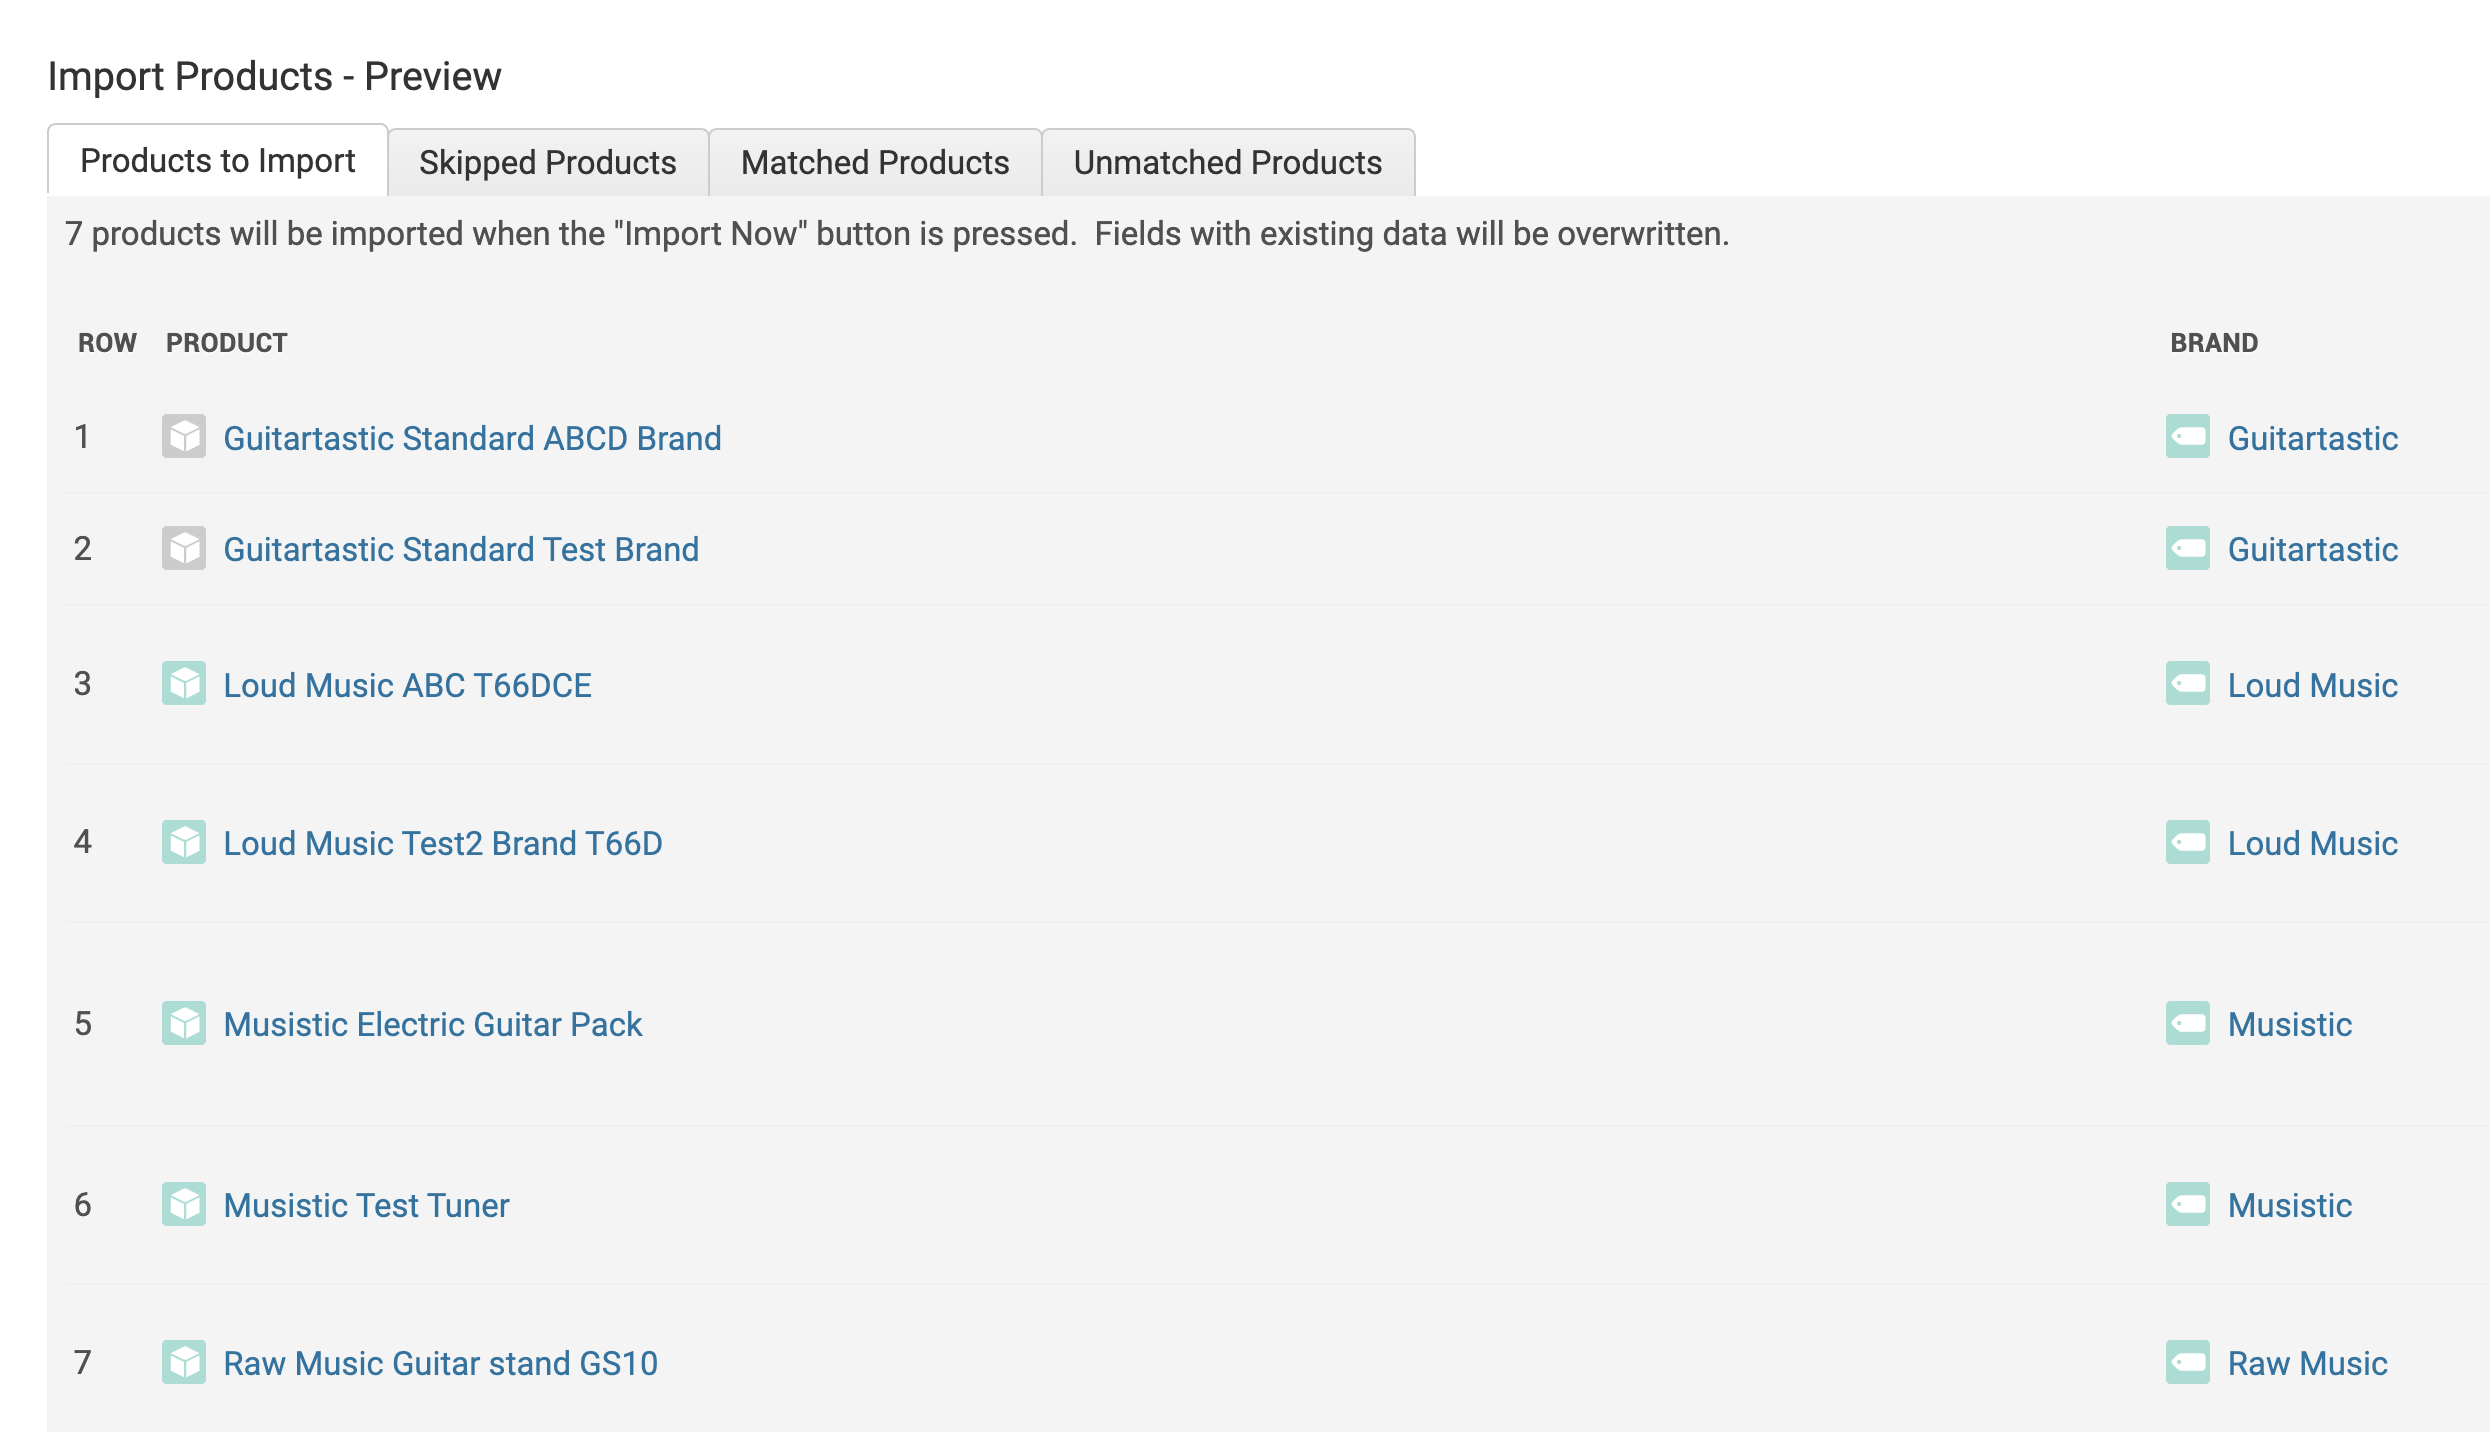
Once you’ve configured all import settings, click the Preview Import button.
Oncord will generate a summary showing how your data will be processed, including:
- Products to Import
- Skipped Products (rows excluded based on settings)
- Matched Products (products already in the system that will be updated)
- Unmatched Products (entries that don’t meet import criteria)
Review the preview carefully. If everything looks correct, click Import Now to complete the import process.