-
Website
-
3min Explainer Walkthrough

- Generate a Design
-
Page Management

-
Page Editing

-
Form Builder

- Updating Your Navigation Menu
- Creating Page Redirectors
- Posts Management
-
Search Engine Optimisation (SEO)

- Setting Up Google Marketing Tools
- Setting Up the Meta Pixel and E-commerce Tracking
- Setting Up Microsoft Marketing Tools
- Setting Up Reddit Pixel and E-commerce Tracking
- Setting Up Linkedin Insight Tag
- Optimizing Images For Web
-
Analytics

- Third Party Embed Code
- Special Files
- Setting Up OpenAI Ads Manager
-
3min Explainer Walkthrough
- Contacts
- Marketing
- Commerce
- Apps
- Settings and Config











- Website
-
-
3min Explainer Walkthrough
- Generate a Design
-
Page Management
-
Page Editing
-
Form Builder
- Updating Your Navigation Menu
- Creating Page Redirectors
- Posts Management
-
Search Engine Optimisation (SEO)
- Setting Up Google Marketing Tools
- Setting Up the Meta Pixel and E-commerce Tracking
- Setting Up Microsoft Marketing Tools
- Setting Up Reddit Pixel and E-commerce Tracking
- Setting Up Linkedin Insight Tag
- Optimizing Images For Web
-
Analytics
- Third Party Embed Code
- Special Files
- Setting Up OpenAI Ads Manager
-
3min Explainer Walkthrough
- Contacts
- Marketing
- Commerce
- Apps
- Settings and Config
Adding Tables to a Page
The Table element enables you to create structured, organized content displays within a page.
To add a Table to a page:
- Open the page editor by navigating to Dashboard > Website > Pages > Create a New Page or click the existing page.
- Click the “Insert” button in the left panel.
- Under the “Layout” heading, drag and drop the "Table" element into the page editing area (typically into a section) on the right.
- By default, the table element contains two rows and two columns (4 cells in total).
- You can then add text content or insert other elements into each cell.
Editing Tables
To edit a table
-
Click the "
" icon in the "Table" label, and then click "Edit". - You can adjust the width of columns by dragging the blue bar left or right.
Right-click a cell to see its editing options.
- Cell - Split a cell with Split Cell Horizontally or Split Cell Vertically. You can also merge it with a neighbouring cell using Merge With Left Cell, Merge With Right Cell, Merge With Above Cell or Merge With Below Cell when the cells can be merged.
- Column - Choose Insert Column Before, Insert Column After or Delete Column.
- Row - Choose Insert Row Before, Insert Row After or Delete Row.
- Delete Table - Remove the entire table. If the table contains just one cell, right-click that cell and choose Cell > Delete Cell and Table.
When you right-click a selection of several cells, use Delete Columns or Delete Rows to remove the selected columns or rows. Merge Cells appears when the selected cells are in the same row and can be merged.
Table Properties
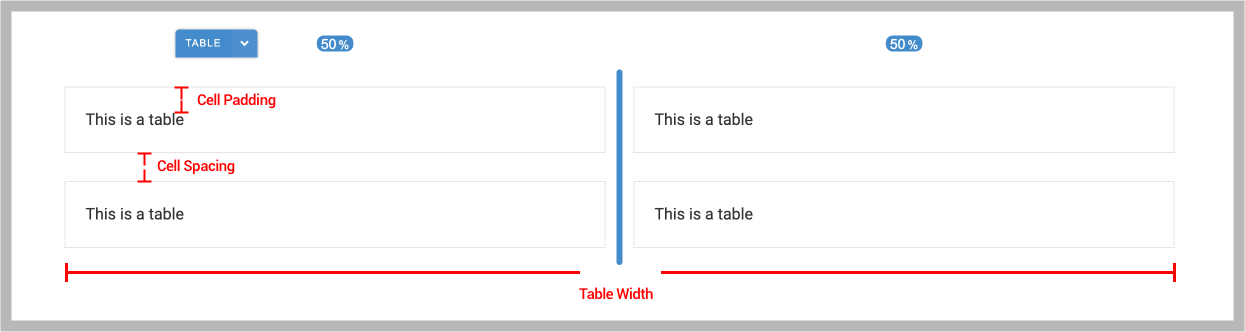
- Cell Padding: It controls the space inside each cell, between the cell’s content (such as text or images) and the cell’s border. Adding padding creates breathing room around the content, making it easier to read.
- Cell Spacing: This defines the space between individual cells in a table. Adjusting cell spacing separates each cell from its neighbors, making them appear as distinct blocks, which can enhance readability and overall layout clarity.
- Table Width: It sets the overall width of the table in its container. Adjusting this width allows you to control how much horizontal space the table occupies. A wider table displays more content per row, while a narrower table can be more adaptable to mobile devices.
- Vertical Align - Align content at the top, middle or bottom of the selected cells.
- Background Colour - Set the background colour of the selected cells.
Cell Padding, Cell Spacing and Table Width accept values in pixels (for example, 10px) or percentages (for example, 5%).